Materials: Plywood

  • Wall-mounted hand-tool peg rack

    Wall-mounted hand-tool peg rack

    Keep small layout and cleanup tools within reach

    Keep small hand tools off the bench and visible on the wall: a try square, a short ruler, a scraper, a hand brush, or safety glasses on a closed loop. This eight-peg rack belongs near a workbench or cleanup area, where those items are easy to grab and return.

    A plywood backboard spans two wood studs. A replaceable solid-wood rail carries eight short hardwood pegs. Tools hang from suitable holes or secure closed loops; the rack has no shelf or slotted holders. The rail screws on from behind before the backboard is mounted.

    Not build tested. Dimensions and fastener clearances have been checked digitally. Peg strength, glue bonds and the installed wall connection still need physical testing; no load rating is established.

    What it stores—and what it does not

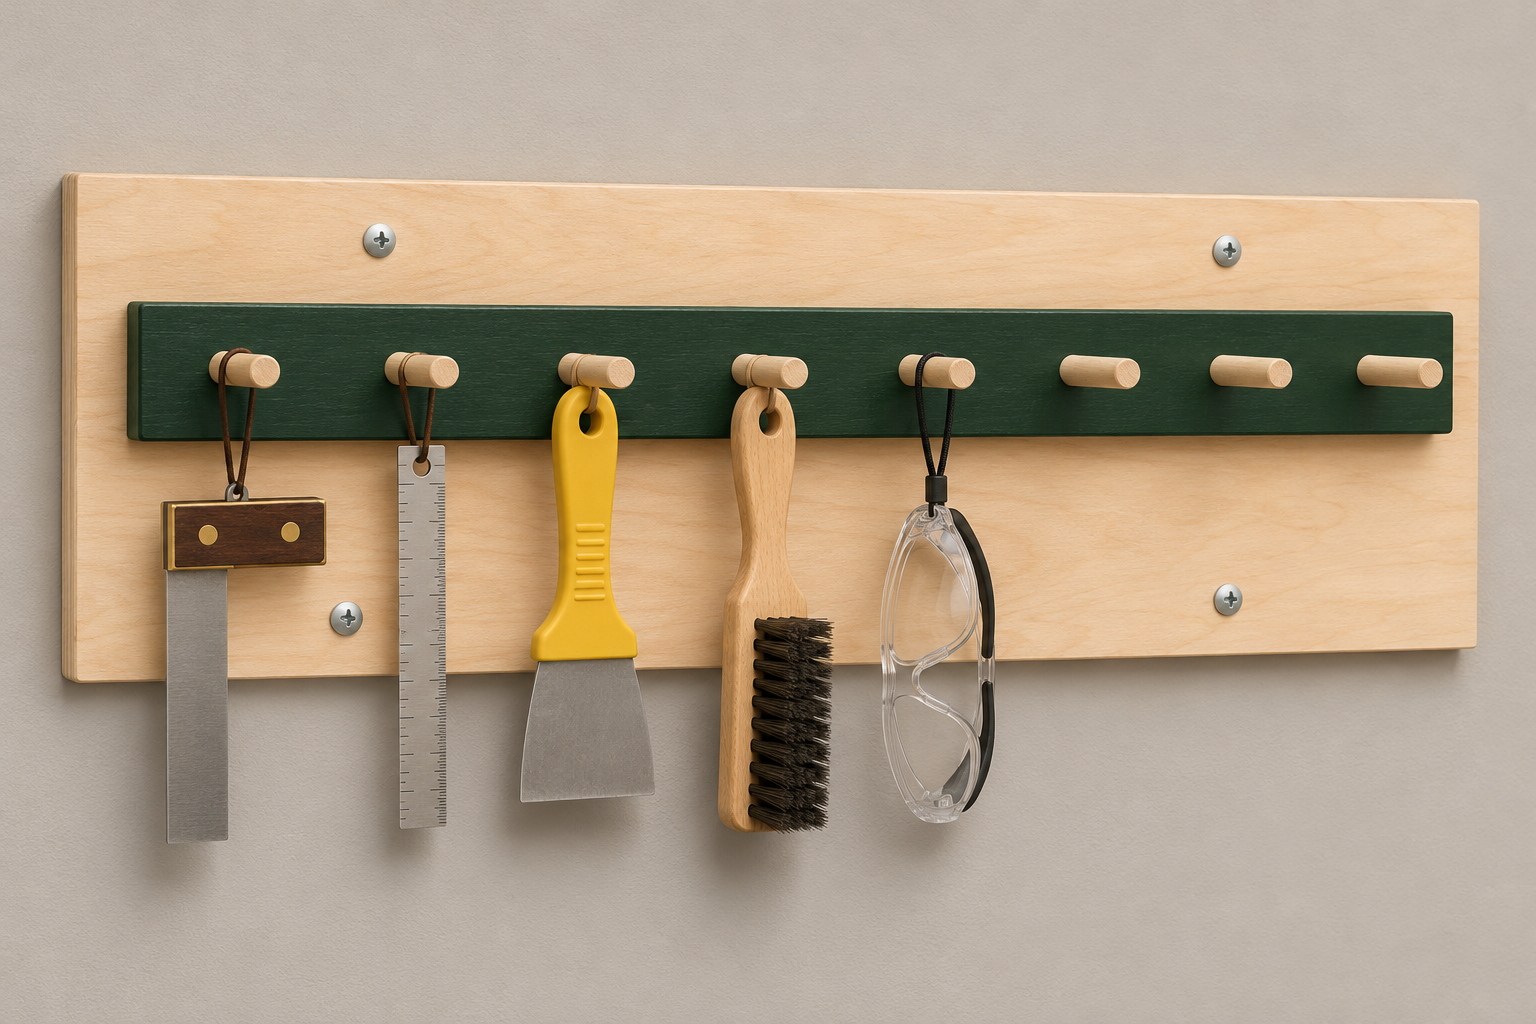
    The render shows five example items and three spare pegs. Test-fit your actual hanging holes and loops on a ½-inch dowel before building. A tool with no suitable hanging point needs a different holder; this design does not directly organize loose screwdrivers, chisels, drill bits, cordless drills or heavy clamps. Space tools so handles and sharp edges cannot collide.

    Mount it above or beside the bench at a reachable height, leaving enough clear wall below for your longest hanging tool. The four visible wall screws fasten the backboard to two verified wood studs; the green holder rail is attached separately from the back of the board. The mounting drawing below gives the example stud layout.

    Cut list

    IDPartQtyActual size (in)
    APlywood backboard132 × 12 × ¾
    BSolid-wood holder rail130 × 2½ × ¾
    CHardwood dowel pegs82½ long × ½ diameter

    The pegs embed ⅝ inch into B and project 1⅞ inches from its face. Backboard, rail and peg projection total 3⅜ inches from the wall. Measure stock and dowel diameter before drilling; nominal dimensions can vary.

    Materials and hardware

    One sound ¾-inch plywood offcut at least 32 × 12 inches; one straight nominal 1×3 at least 30 inches long (actual ¾ × 2½); one 36-inch-long, ½-inch hardwood dowel; wood glue; ten #8 × 1¼-inch countersunk wood screws for the rail; and four 3-inch washer-head cabinet/structural wood screws approved by their maker for wood-stud mounting. Choose screws for the actual wall thickness and required embedment; do not substitute drywall screws.

    A nominal 2×4-foot plywood panel supplies the backboard. A four-foot 1×3 supplies the rail. Eight pegs require 20 inches of dowel plus saw kerfs and end trimming. Use a clamped cradle when cutting round dowel so it cannot roll.

    Required tools

    Tape measure, square, pencil, stud finder and a way to verify stud centers; circular saw with a guide or another suitable saw; drill/driver; ½-inch brad-point bit and a depth stop; countersink and screw-maker-specified pilot bits; clamps; sandpaper. A drill press helps keep peg holes square but is optional.

    Layout drawing
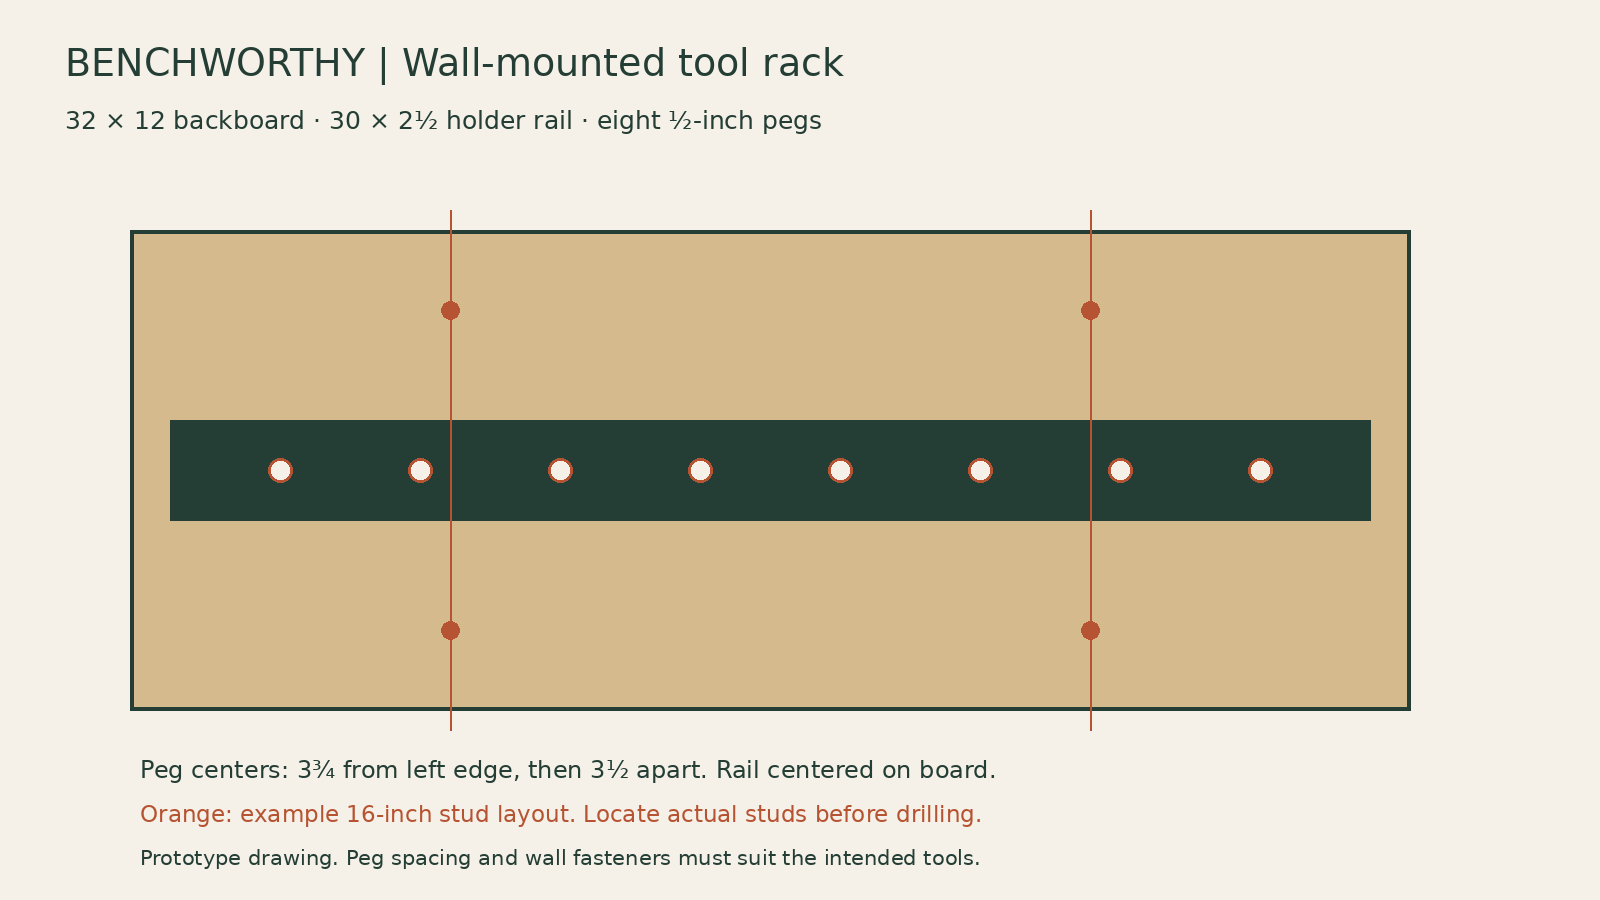
    32 by 12 inch tool rack with eight pegs and example stud mounting locations.

    Use the backboard’s upper-left corner as the origin. Center B horizontally and vertically: its left end is X = 1 inch and its top edge is Y = 4¾ inches. Peg centers are on Y = 6 inches at X = 3¾, 7¼, 10¾, 14¼, 17¾, 21¼, 24¾ and 28¼ inches.

    Rail attachment screws go through the BACK of A into B. Use X = 2, 9, 16, 23 and 30 inches on two rows, Y = 5¼ and 6¾ inches. These ten positions avoid the peg holes. Countersink the rear heads flush so the backboard can sit flat against the wall.

    Wall mounting

    This mounting detail is for two sound wood studs approximately 16 inches on center behind flat ½- or ⅝-inch drywall. It is not a drywall-anchor, metal-stud or masonry detail. Locate both actual stud centerlines before positioning the board. Center the rack between them; X = 8 and 24 inches is the illustrated example, not permission to assume the studs are there.

    Use two wall screws per stud: one about 2 inches down from the backboard top and one about 2 inches up from its bottom. Keep the holes outside the holder rail. Select screw length from ¾-inch backboard thickness + actual wall covering + the screw manufacturer’s required wood embedment. A 3-inch screw leaves 1⅝ inches in wood behind ⅝-inch drywall, before accounting for any gap. Follow the actual screw’s instructions; longer is not automatically better because hidden services may be present.

    Inspect and verify the wall before drilling. Do not mount across an uneven surface or tighten the board into a curve. If the wall construction or stud spacing differs, revise the mounting detail rather than relying on the four example holes.

    Assembly steps

    1. Fit the tools on paper. Lay out your actual small hand tools within the 32 × 12-inch footprint. Check that their hanging holes or loops fit ½-inch pegs and that handles do not collide. Eight equally spaced pegs are the default; fewer well-spaced tools may work better.

    2. Cut A and B. Square the backboard and rail. Mark a front face on each. Ease sharp corners and sand exposed edges, keeping the rail’s back and peg-gluing surfaces clean.

    3. Mark and drill B. Transfer the peg centers to the rail, or subtract 1 inch from the backboard X coordinates to measure from B’s left end. Drill ½-inch holes ⅝ inch deep, square to its face. Use a physical depth stop and test it on scrap of the same thickness; the ¾-inch rail leaves only ⅛ inch behind a hole. A piece of tape alone is not a positive depth stop.

    4. Dry-fit C. Cut eight 2½-inch pegs and ease their exposed ends. Check a snug fit without forcing or splitting B. Verify the actual embedment and 1⅞-inch projection. Do not enlarge a loose fit and expect glue to fill it structurally.

    5. Screw B to A. Clamp the rail in its centered position. Transfer the ten rear screw positions and confirm none intersect a peg hole. Drill appropriate clearance/pilot holes, countersink the backboard’s rear face, then install the ten 1¼-inch screws from the back. With two ¾-inch parts, nominal screw penetration into B is ½ inch and the tips remain ¼ inch behind its front face; avoid deep countersinking. Keep this joint unglued so the rail can be replaced after the rack is removed from the wall.

    6. Glue the pegs. Apply glue according to its instructions, seat each peg to the checked depth, and wipe off squeeze-out. Keep all pegs square to the rail. Allow a full cure before handling or hanging tools. They are horizontal pegs: use secure hanging holes or loops, not items balanced on their tips.

    7. Finish. Apply an optional suitable finish after the glue cures. Keep peg surfaces smooth and allow the finish to cure fully before use.

    8. Mount the board. Locate and verify the two wood studs, choose mounting height around your tools and reach, and mark their actual centers on A. Drill the four mounting holes and stud pilot holes to the selected fastener’s requirements. With assistance, hold the board level and install the washer-head screws, seating them snugly without crushing the plywood or wall covering.

    9. Check the prototype. Verify the board sits flat and cannot rock, and inspect each peg and glue joint. Add only the intended small tools gradually and check for movement. Do not use it for heavy power tools, overhead storage, or supporting people. Remove tools and repair any looseness rather than tightening repeatedly into damaged wood.

    Changes you can make

    Move or omit peg positions to fit your actual tools, preserving clear space around the attachment screws and adequate wood around every hole. Make wider or narrower racks only after revising the stud layout, backboard, rail, peg pattern and mounting fasteners together. This version intentionally offers a fixed cut list rather than an unverified universal width calculator.

    Project notes

    This is an untested prototype. Actual wall fasteners, peg loading and the installed assembly must be checked before treating it as a tested design. No capacity rating is claimed. The rail is removable only after the backboard is taken off the wall. Use secure hanging loops for suitable tools and keep sharp edges protected.

    Fastener reference: GRK cabinet-screw product information. Follow the instructions for the screw actually selected; that reference does not certify this rack.
  • Mobile workshop assembly table

    Mobile workshop assembly table

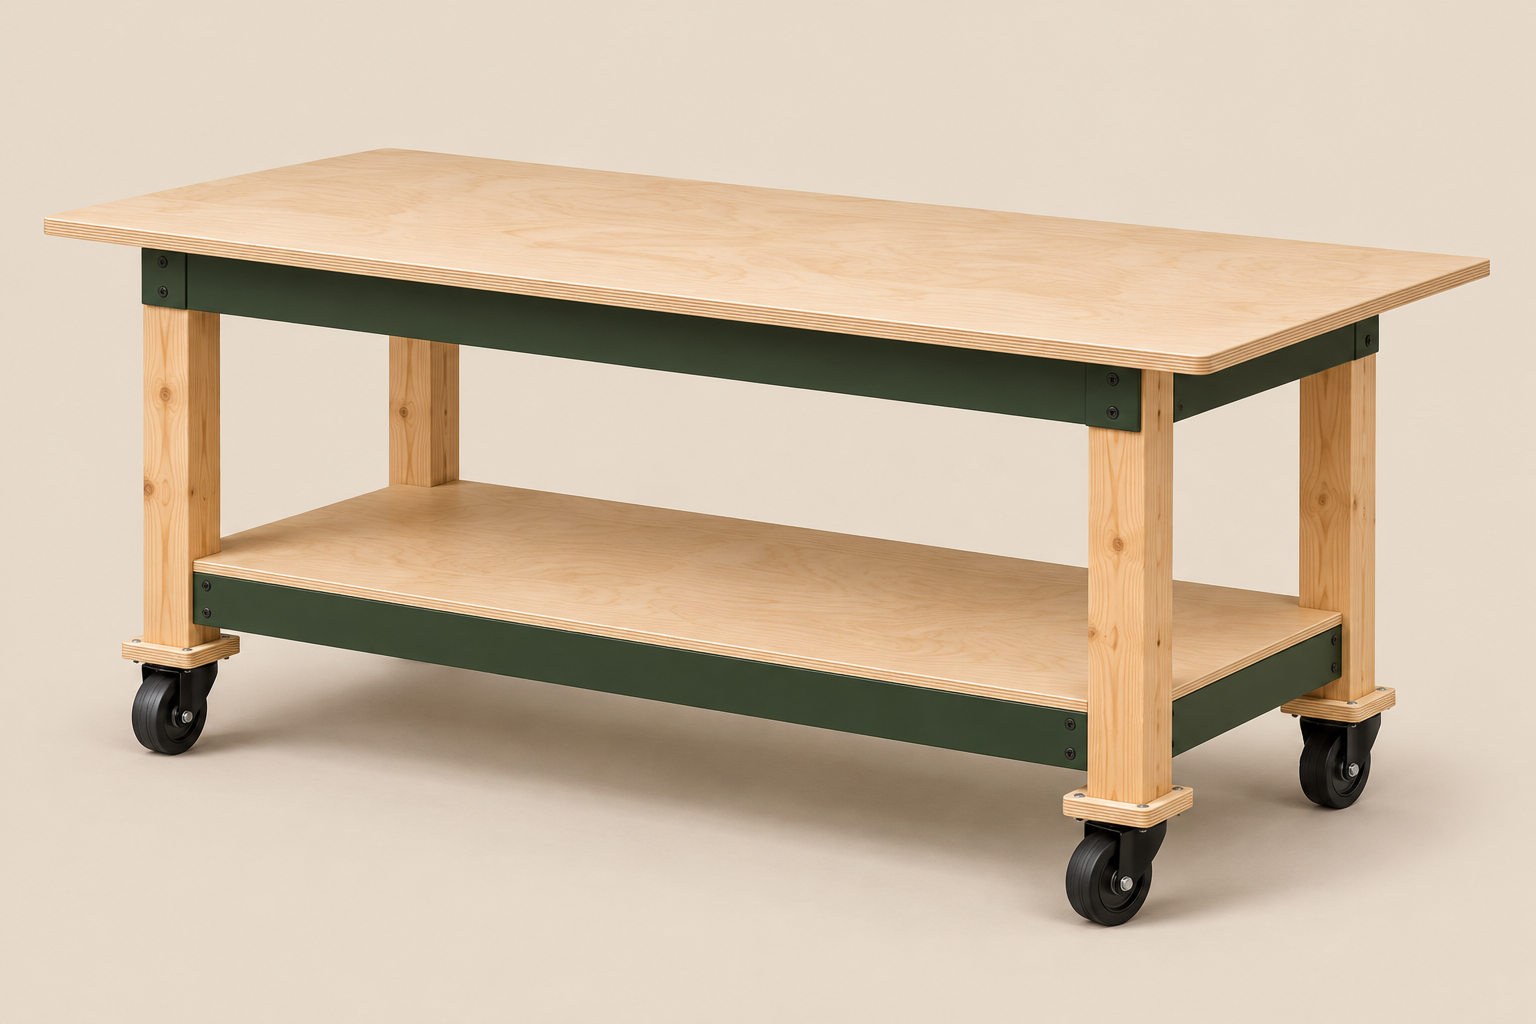
    Revision 2 · untested prototype. This version specifies the connections and fastener schedule, simplifies the shelf, and adds cutting and joint drawings. It has not been physically build tested. Use the drawings for construction; the cover rendering is an illustration.

    A mobile table with room to clamp

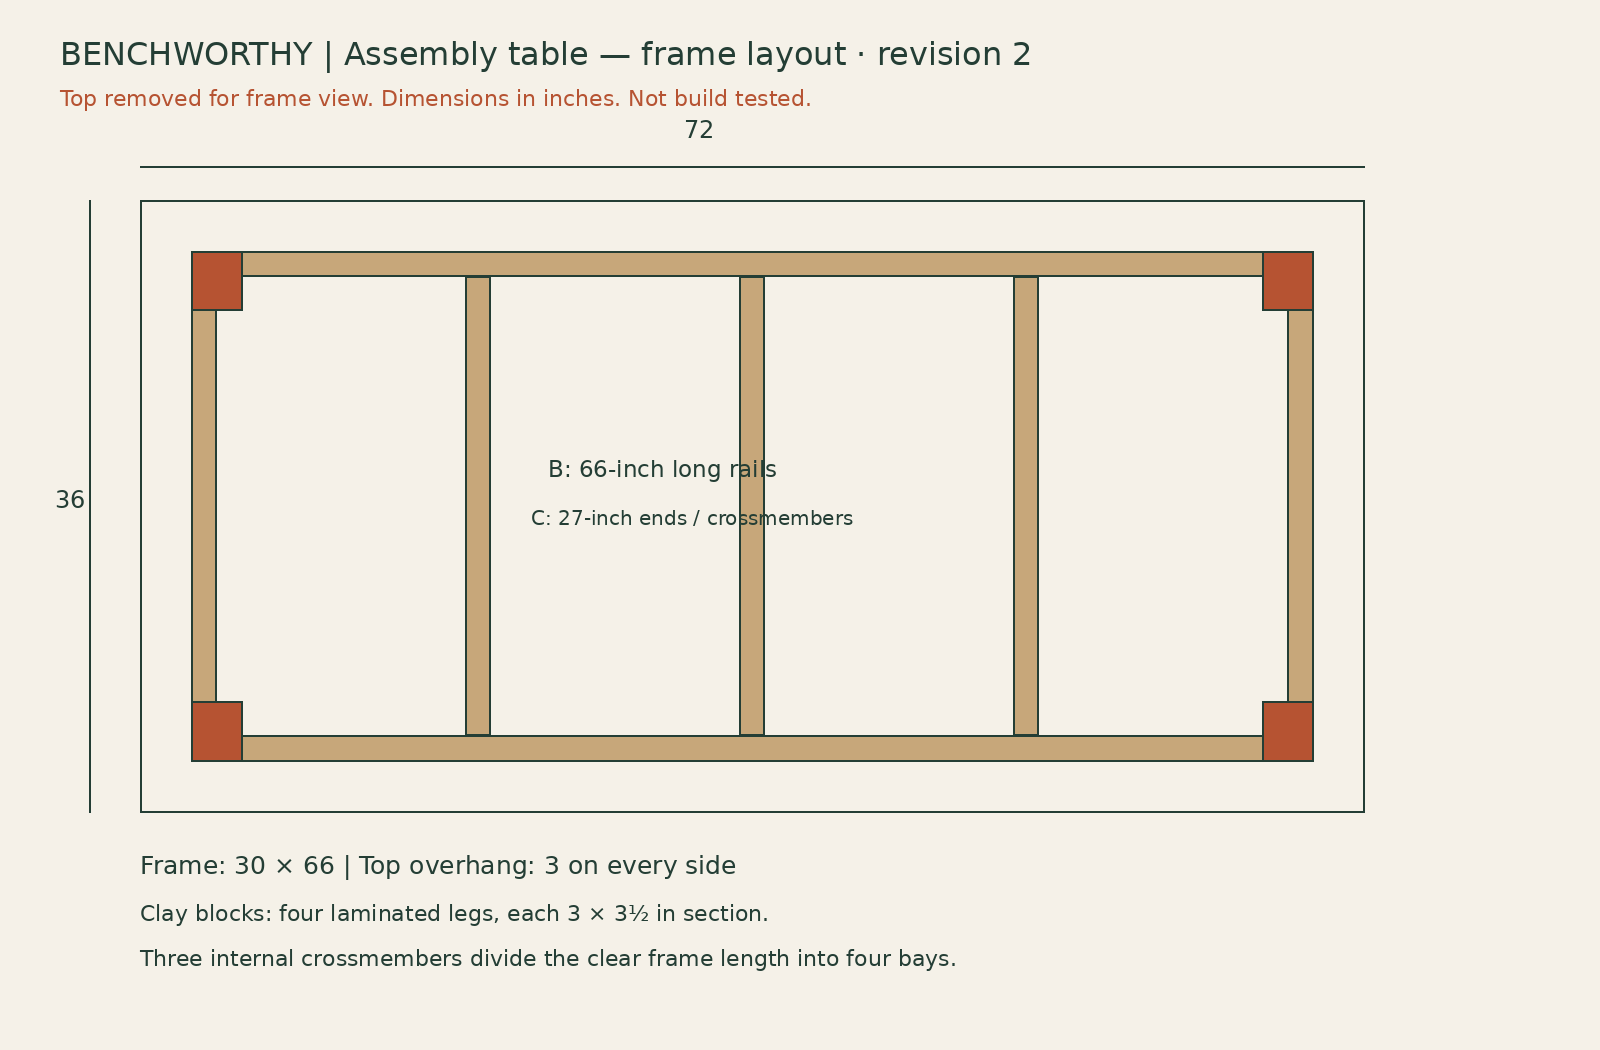
    A 36 × 72-inch plywood top sits on a 30 × 66-inch upper frame, leaving 3 inches of overhang on every side. The default finished height is 34 inches, including your caster assemblies. Four legs are laminated from pairs of 2×4s. Two lower rails attach directly to the inside faces of the legs and support a rectangular 60 × 23-inch shelf—no shelf notches or special rail-end connectors.

    Revision 2 upper frame layout, 30 by 66 inches beneath a 36 by 72 inch top.

    Choose and measure the caster assemblies

    Use four matching plate-mounted swivel casters with both wheel and swivel locks. Each mounts beneath an 8 × 8-inch plywood pad. The leg bears on the pad; two steel corner braces connect the pad to opposite side-grain faces of the leg. This avoids relying on screws driven into the leg’s end grain to retain the pad.

    Select the caster and corner braces together before cutting the legs. Use 2-inch-leg steel corner braces with two usable holes per flange. Check that the horizontal flanges fit within the pad. On a full-size paper layout, mark the 3 × 3½-inch leg footprint, the two brace footprints, and the caster plate. Select a caster bolt pattern whose heads, washers and tool access clear the leg and braces. A plate that cannot satisfy that layout is incompatible with this mounting detail; do not enlarge holes or weaken the leg to force a fit.

    The installed caster assembly height is the distance from the bottom of the wooden leg to the floor. Include the pad thickness, mounting plate, swivel assembly and wheel. Enter that measured height in the calculator. Wheel diameter is not the installed height. All four assemblies must have the same installed height.

    Calculate the legs

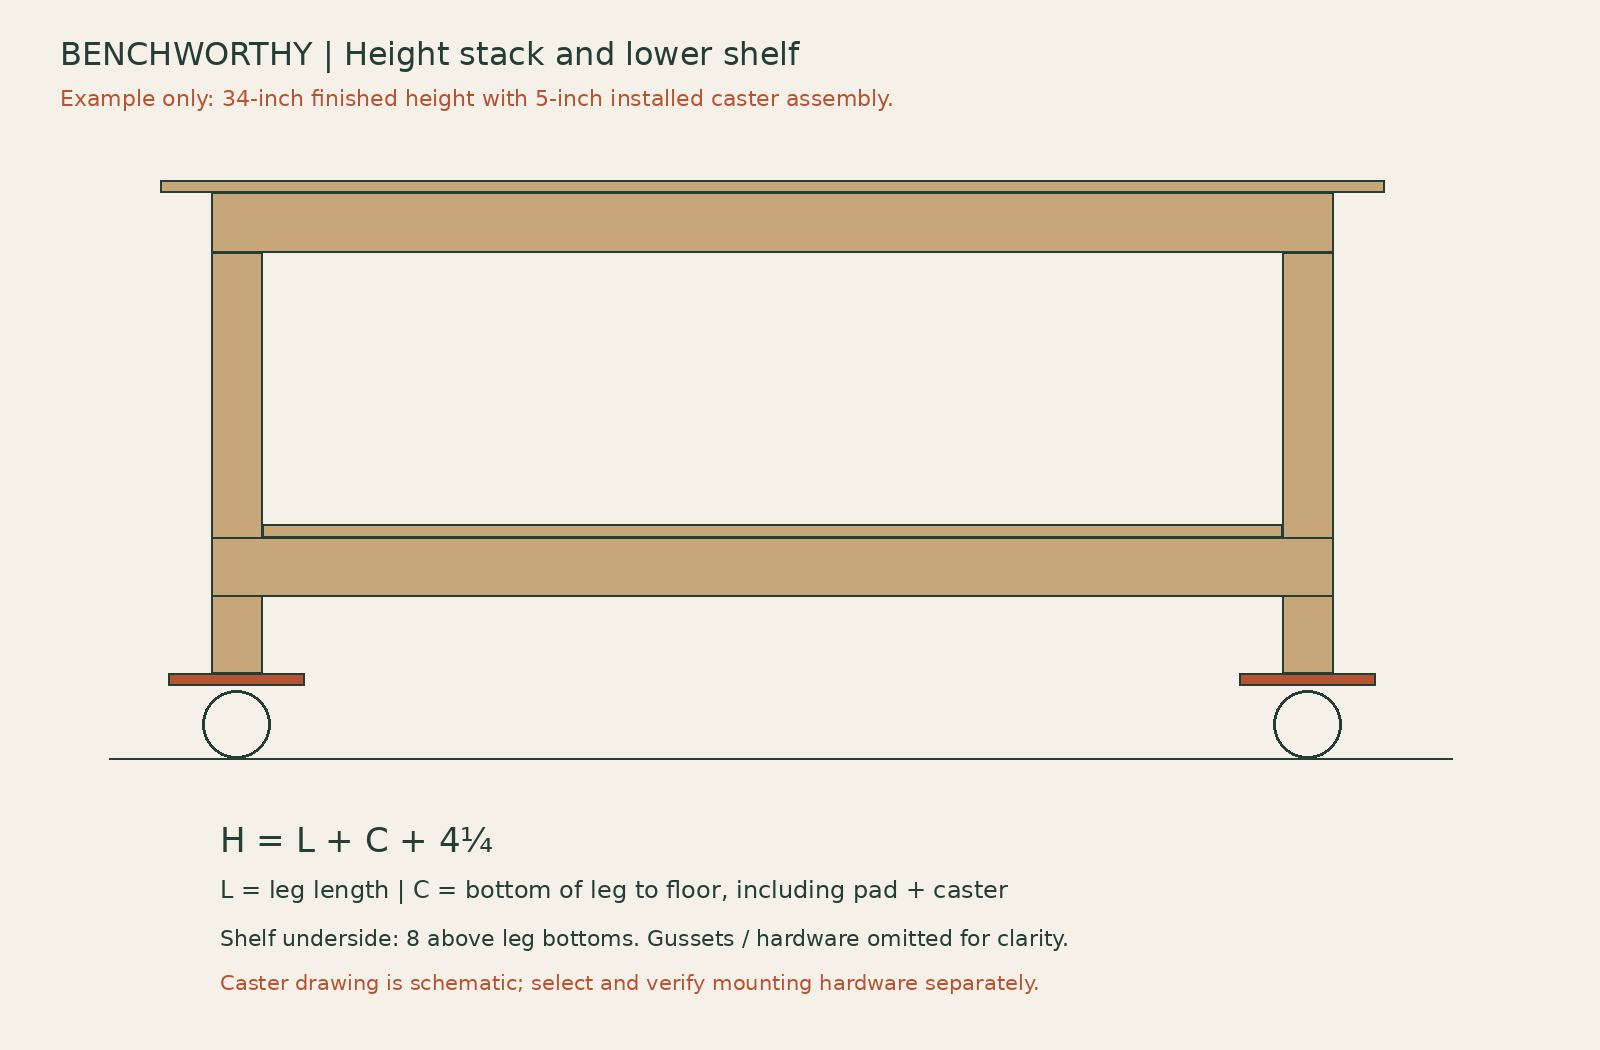
    The upper frame rests on the leg ends. With actual 3½-inch-deep rails and a ¾-inch top, the construction above the legs totals 4¼ inches. Leg length = finished height − installed caster assembly height − 4¼ inches. If your material differs, use the actual combined rail depth and top thickness in a manual calculation; the on-page calculator assumes the specified 4¼-inch stack.

    Example: a 34-inch finished table with a 5-inch installed caster assembly needs eight 24¾-inch leg components. A 6-inch assembly reduces those components to 23¾ inches. Choose and measure hardware before batching those cuts.

    Outfeed mode targets a surface ⅛ inch below your equipment’s work surface. For 35-inch equipment and 5-inch caster assemblies: finished table height is 34⅞ inches and leg length is 25⅝ inches. Confirm the appropriate clearance, miter-bar path, fence movement and support position for your actual equipment.

    Revision 2 height stack and rectangular shelf. Finished height equals leg length plus caster assembly plus 4.25 inches.

    Cut list

    Actual finished dimensions in inches. “2×4” means actual 1½ × 3½-inch stock here. Part A is calculated; all other parts are fixed. Four J square blanks produce eight triangular gussets. The part IDs match the live cut list.

    IDPartQtyLength × width × thickness (in)
    ALeg lamination8Calculated × 3½ × 1½
    BUpper long rail266 × 3½ × 1½
    CUpper ends and crossmembers527 × 3½ × 1½
    DLower shelf support rail266 × 3½ × 1½
    FTop panel172 × 36 × ¾
    GShelf panel160 × 23 × ¾
    HCaster mounting pad48 × 8 × ¾
    JGusset square blank48 × 8 × ¾; cut diagonally

    Materials and fasteners

    Allow ten straight 2×4×8-foot boards and two nominal 4×8 sheets of ¾-inch plywood. Inspect for twist, splits and damage; the layout is a purchasing allowance, not a guarantee of yield from defective stock. Use wood glue for the leg laminations and multipurpose wood screws intended for wood construction, rather than drywall screws.

    ConnectionSpecificationInstalled quantity
    C ends to B railsTwo #10 × 3-inch wood screws at each of ten rail ends20
    D rails to leg side grainTwo #10 × 3-inch wood screws at each of four overlaps8
    Eight J gussetsFive #8 × 1¾-inch wood screws per triangle40
    F top to frame#8 × 1¾-inch countersunk wood screws12
    G shelf to D rails#8 × 1¼-inch wood screws8
    Corner braces to leg side grainTwo #10 × 1½-inch wood screws per brace, subject to brace-hole compatibility16
    Corner braces to padsTwo machine bolts per horizontal flange, with washers and locking nuts; size to brace holes and measured stack16
    Caster plates to padsFour through-bolts per caster, with washers and locking nuts; size to caster instructions and measured stack16

    Buy approximately 50 of the 3-inch wood screws, 75 of the 1¾-inch wood screws, and 25 each of the 1¼- and 1½-inch wood screws. Add eight steel corner braces and four casters. Select the 32 machine-bolt assemblies only after laying out the actual hardware. Include washers under heads and nuts where the hardware permits, and enough bolt length for full locking-nut engagement. Keep bolt heads outside the leg’s bearing footprint; all hardware must clear the swivel and brakes.

    Cutting layout

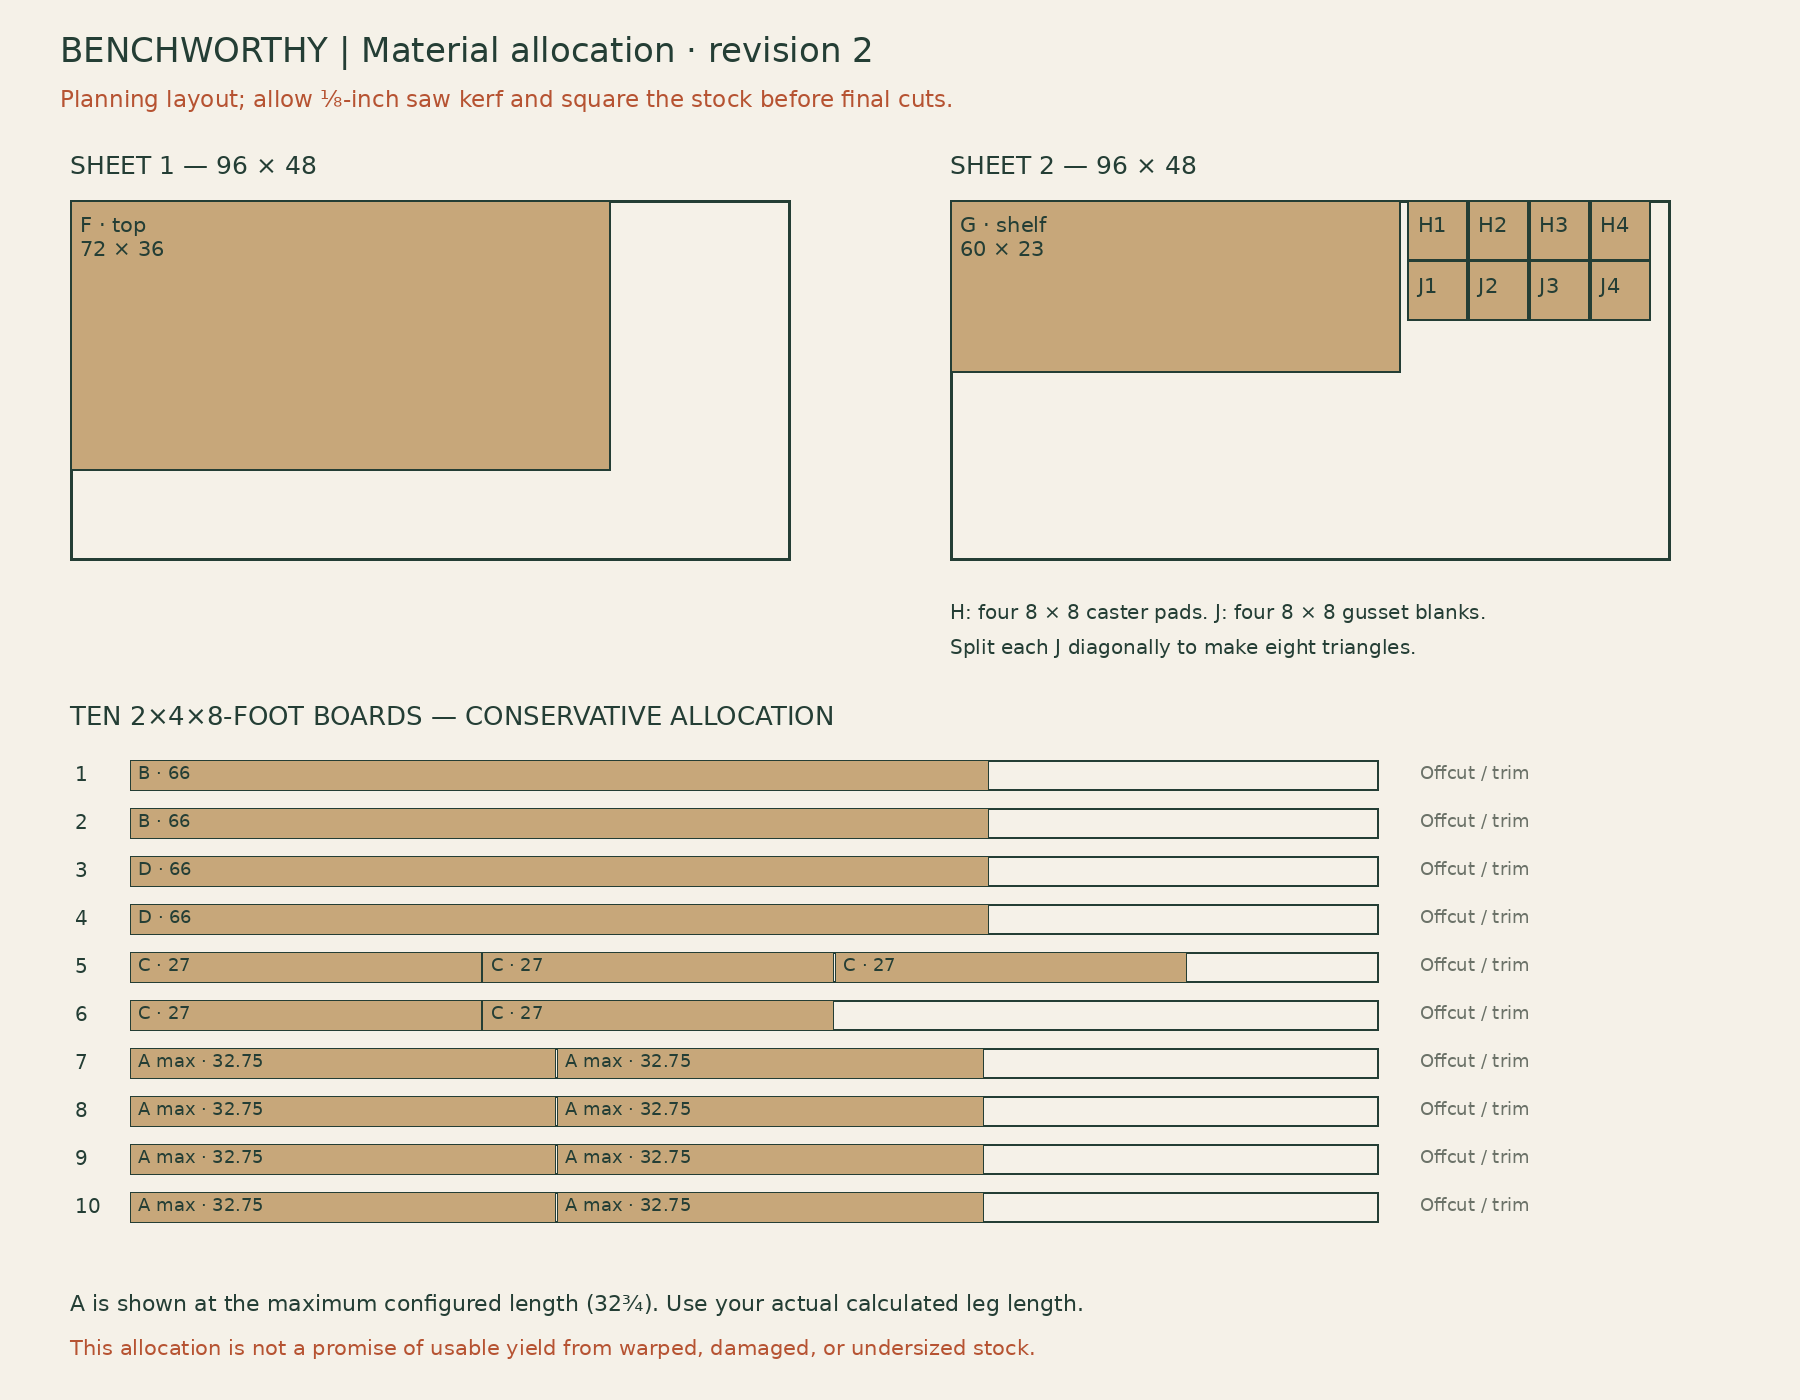
    Boards 1–2: one B from each. Boards 3–4: one D from each. Boards 5–6: split the five C parts as three and two. Boards 7–10: two A parts per board. The layout accommodates a ⅛-inch kerf and the maximum configured 32¾-inch leg length. Shorter legs leave larger offcuts.

    Sheet 1 supplies the top. Sheet 2 supplies the 60 × 23-inch shelf plus four caster pads and four gusset squares. Square and measure the sheets before laying out final cuts. The diagram includes separation for kerfs; keep defects out of the leg connections and caster pads.

    Revision 2 allocation across two plywood sheets and ten 8-foot boards.

    Connection details

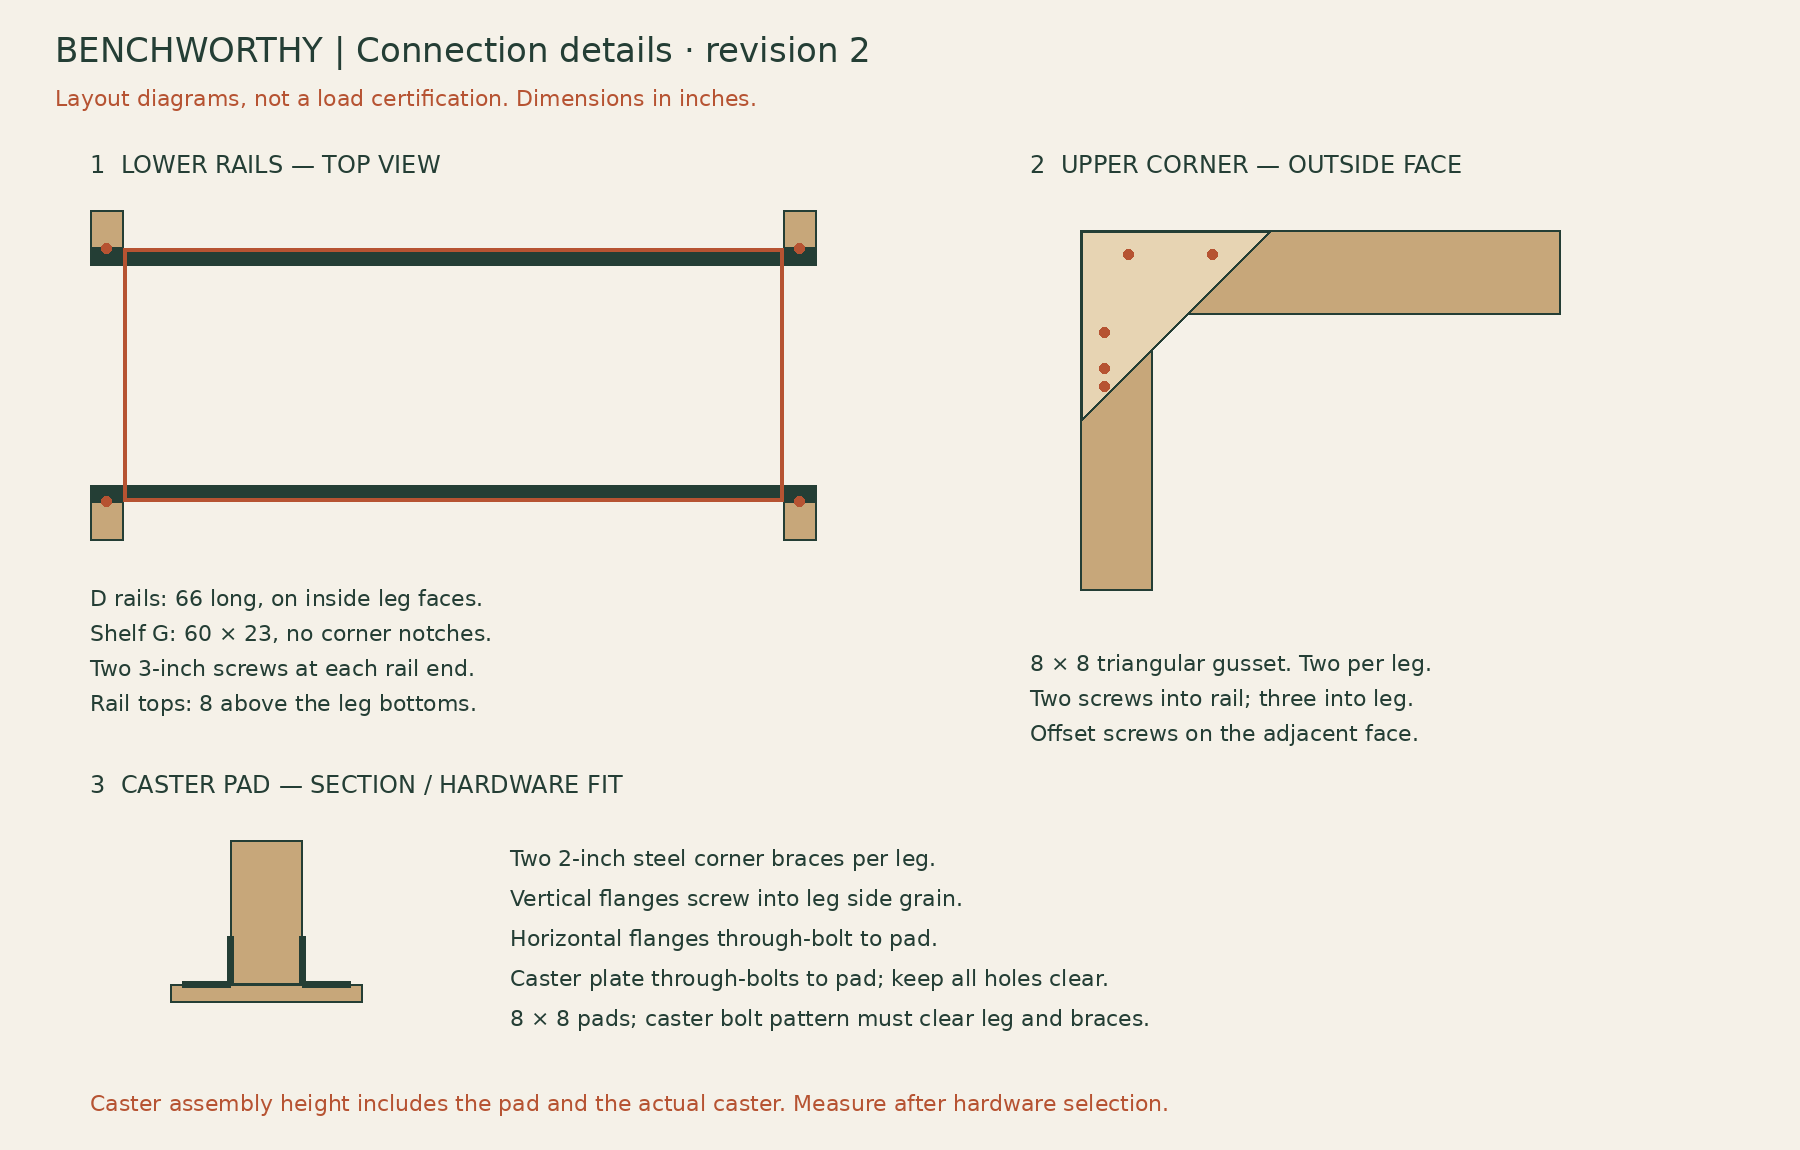
    Revision 2 connection diagrams: side-grain lower rails, upper gussets, and braced caster pads.

    Assembly sequence

    1. Lay out the hardware and record the height. Complete the caster-pad paper layout above. Measure the assembled pad-and-caster height. Select standalone or outfeed mode and write down the calculated leg length. Confirm actual lumber dimensions and plywood thickness before trusting the numbers.

    2. Cut and label. Cut B, C, D and the plywood blanks. Cut all eight A laminations to one checked stop setting. Make a sample cut and measure it before batching. Rip and crosscut the shelf to fit between the legs; if the actual opening is tighter, trim only the clearance needed for a slip fit.

    3. Glue the legs. Pair A pieces broad face to broad face to form four 3 × 3½-inch legs. Use an even glue layer, align both ends, and clamp against a flat reference until cured according to the adhesive instructions. A twisted lamination makes the entire table harder to square.

    4. Assemble the upper frame. Position two C end rails between B long rails. All members stand on their 3½-inch edge. Check a 30 × 66-inch outside rectangle, equal diagonals and no twist. Fasten each C end with two 3-inch screws through B. Put the screw centers about ⅞ inch from the top and bottom edges of B. Use the screw maker’s pilot and countersink guidance, especially near ends and in split-prone stock.

    5. Add the crossmembers. Fit the other three C pieces between B. With 1½-inch rail thickness, four equal clear bays are 14⅝ inches. Clamp each crossmember square, then use two 3-inch screws through B into each end. Recheck the diagonals and frame twist after fastening.

    6. Seat and brace the legs. Place the frame upside down on a flat surface. Orient the leg’s 3-inch dimension along the 66-inch direction and its 3½-inch dimension along the 30-inch direction. Set each leg end directly against the underside of the frame at a corner, with the outside faces aligned. Add two J triangles per corner on adjacent outside faces. Align the triangle’s 8-inch horizontal edge with the frame top and its vertical edge down the leg. Each gets two 1¾-inch screws into the rail and three into the leg. Keep screws clear of the triangular edges and stagger positions on adjacent faces so the screws do not intersect. The frame bears on the leg ends; the gussets retain and brace the connection.

    7. Install the lower rails. Mark a line 8 inches up from the bottom of every wooden leg. Set the top of each D rail on that line, against the inside faces of the two legs on one long side. The 66-inch rail overlaps each end leg by 3 inches. Use two 3-inch screws through the rail into each leg, centered within that overlap, approximately ¾ inch below the rail top and ¾ inch above its bottom. These screws enter leg side grain. Repeat on the other side; check the diagonals and squareness before tightening fully.

    8. Install the caster pads. Center H beneath each leg. Fit two corner braces on opposite leg faces with their horizontal flanges resting on the pad. Drill the pad holes from the actual brackets, deburr the holes, and through-bolt those flanges with washers and locking nuts. Fasten the vertical flanges to leg side grain with compatible 1½-inch wood screws. The wooden leg must bear flat on the pad; no bolt head or washer may sit between them. Check the layout before drilling any caster holes.

    9. Bolt on the casters. Through-bolt each caster plate to its pad using four bolt assemblies sized to the caster’s instructions. Tighten locking nuts without crushing the plywood. Turn each caster through its full sweep and operate its locks to check clearance. Re-measure from the leg bottom to the floor; if it differs from the value used to cut A, resolve that discrepancy before continuing. Fit all four casters, then turn the table upright with assistance.

    10. Fit the shelf. Set G on the two D rails between the legs. It should rest on both rails with a slip fit, not force the legs apart. Install four 1¼-inch screws along each supported shelf edge. Position the screw line over the middle of the 1½-inch rail thickness. Keep unsupported shelf ends free of unnecessary holes.

    11. Attach the top. Center F for 3 inches of overhang on every side. Drive six 1¾-inch screws down through the top into each long B rail. With the top’s 72-inch direction as X, suitable positions are X = 9, 18, 27, 45, 54 and 63 inches; the two screw lines are 3¾ inches in from the long edges. Check those locations against the actual frame and other fasteners. Set heads flush, not deeply buried, and leave the top unglued so it can be replaced.

    12. Inspect the prototype. Check the finished height on the intended floor with all locks set. Inspect every pad, brace, bolt and screw, and check for rocking or racking before use. Recheck fasteners after initial movement. For outfeed, confirm clear travel with the equipment isolated before using it for support.

    Finish and maintenance

    Ease exposed edges and sand splinters. If desired, apply a finish suitable for your shop use, keeping it out of glue joints before assembly. Let it cure before glue-ups. Replace a damaged top or caster pad rather than relying on finish to strengthen it. Periodically check locks and fasteners.

    Prototype notes

    Revision 2 replaces the original four lower stretchers with two side-grain-fastened shelf rails. The shelf is now rectangular and the caster pads are 8 × 8 inches. Do not combine the old shelf, pad dimensions or rail lengths with this revision.

    The dimensions and part relationships have been checked digitally, but the mounting hardware has not been purchased or physically fitted, and the table has not been built. No load rating is established. The configured height and caster ranges describe geometry, not tested performance. Prototype checks still include racking, shelf deflection, lock performance, mounting-pad stiffness, hardware clearance, and actual outfeed fit.

    Fastener reference: GRK’s multipurpose screw information. Follow the instructions for the actual fasteners, brackets and casters you select; the reference is not a certification of this table.