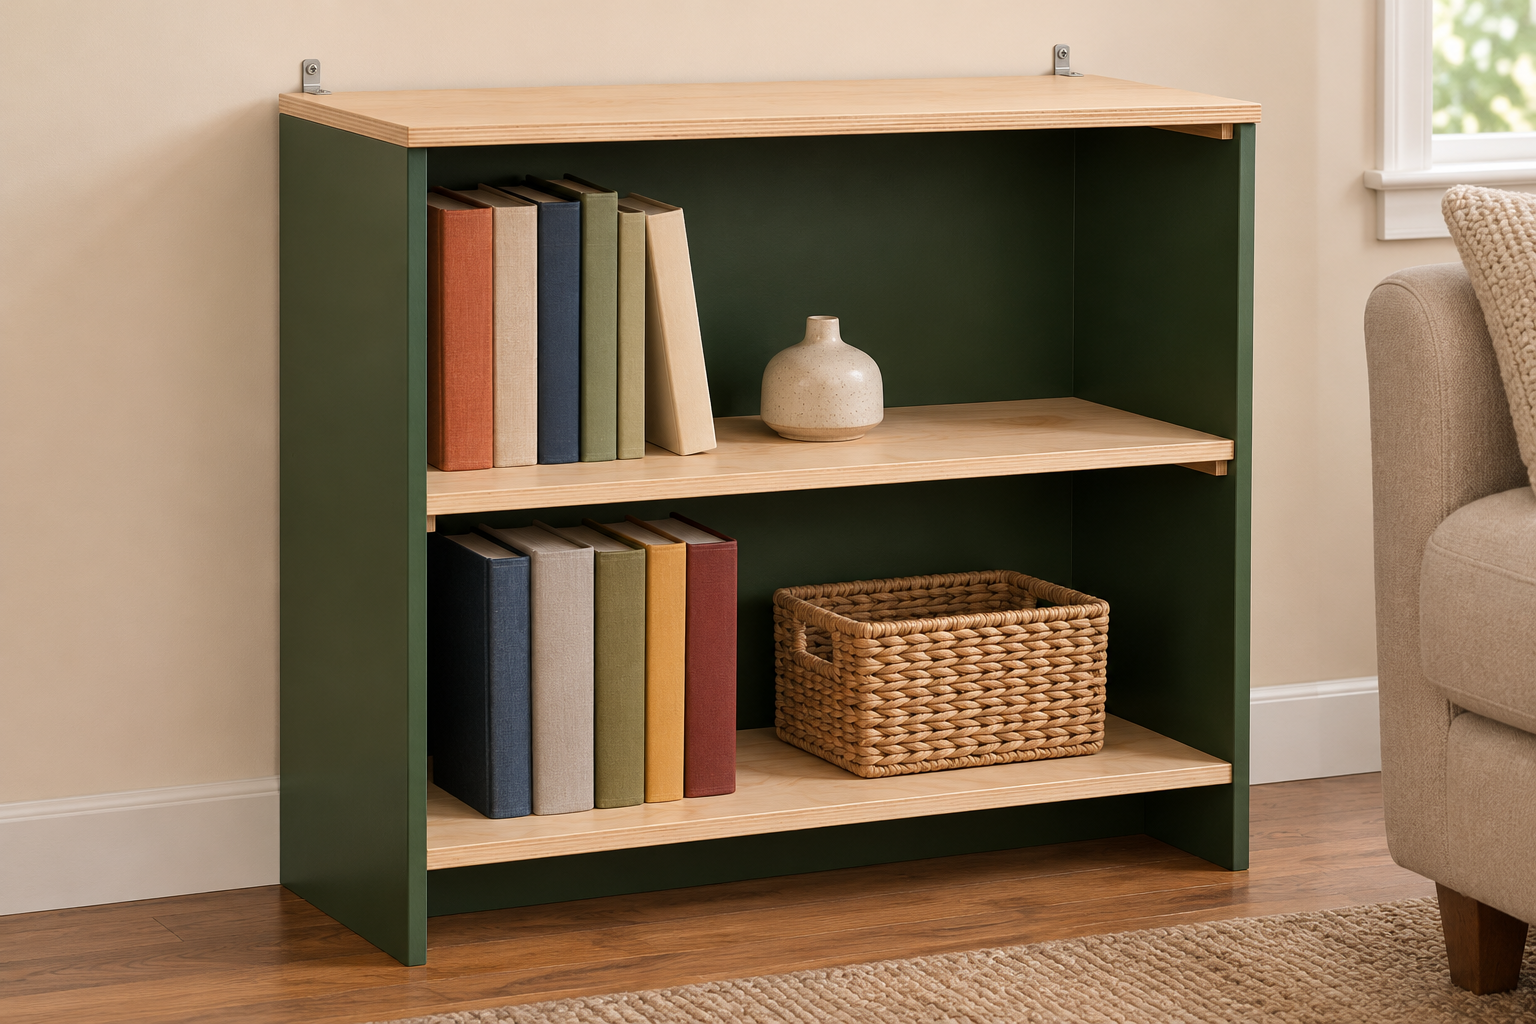
A 30-inch-tall bookcase keeps books and small baskets within easy reach. Two fixed shelves and a full plywood back create a simple open-front cabinet. Secure it to wall studs before loading; its low height does not make it tip-proof.
Check the fit
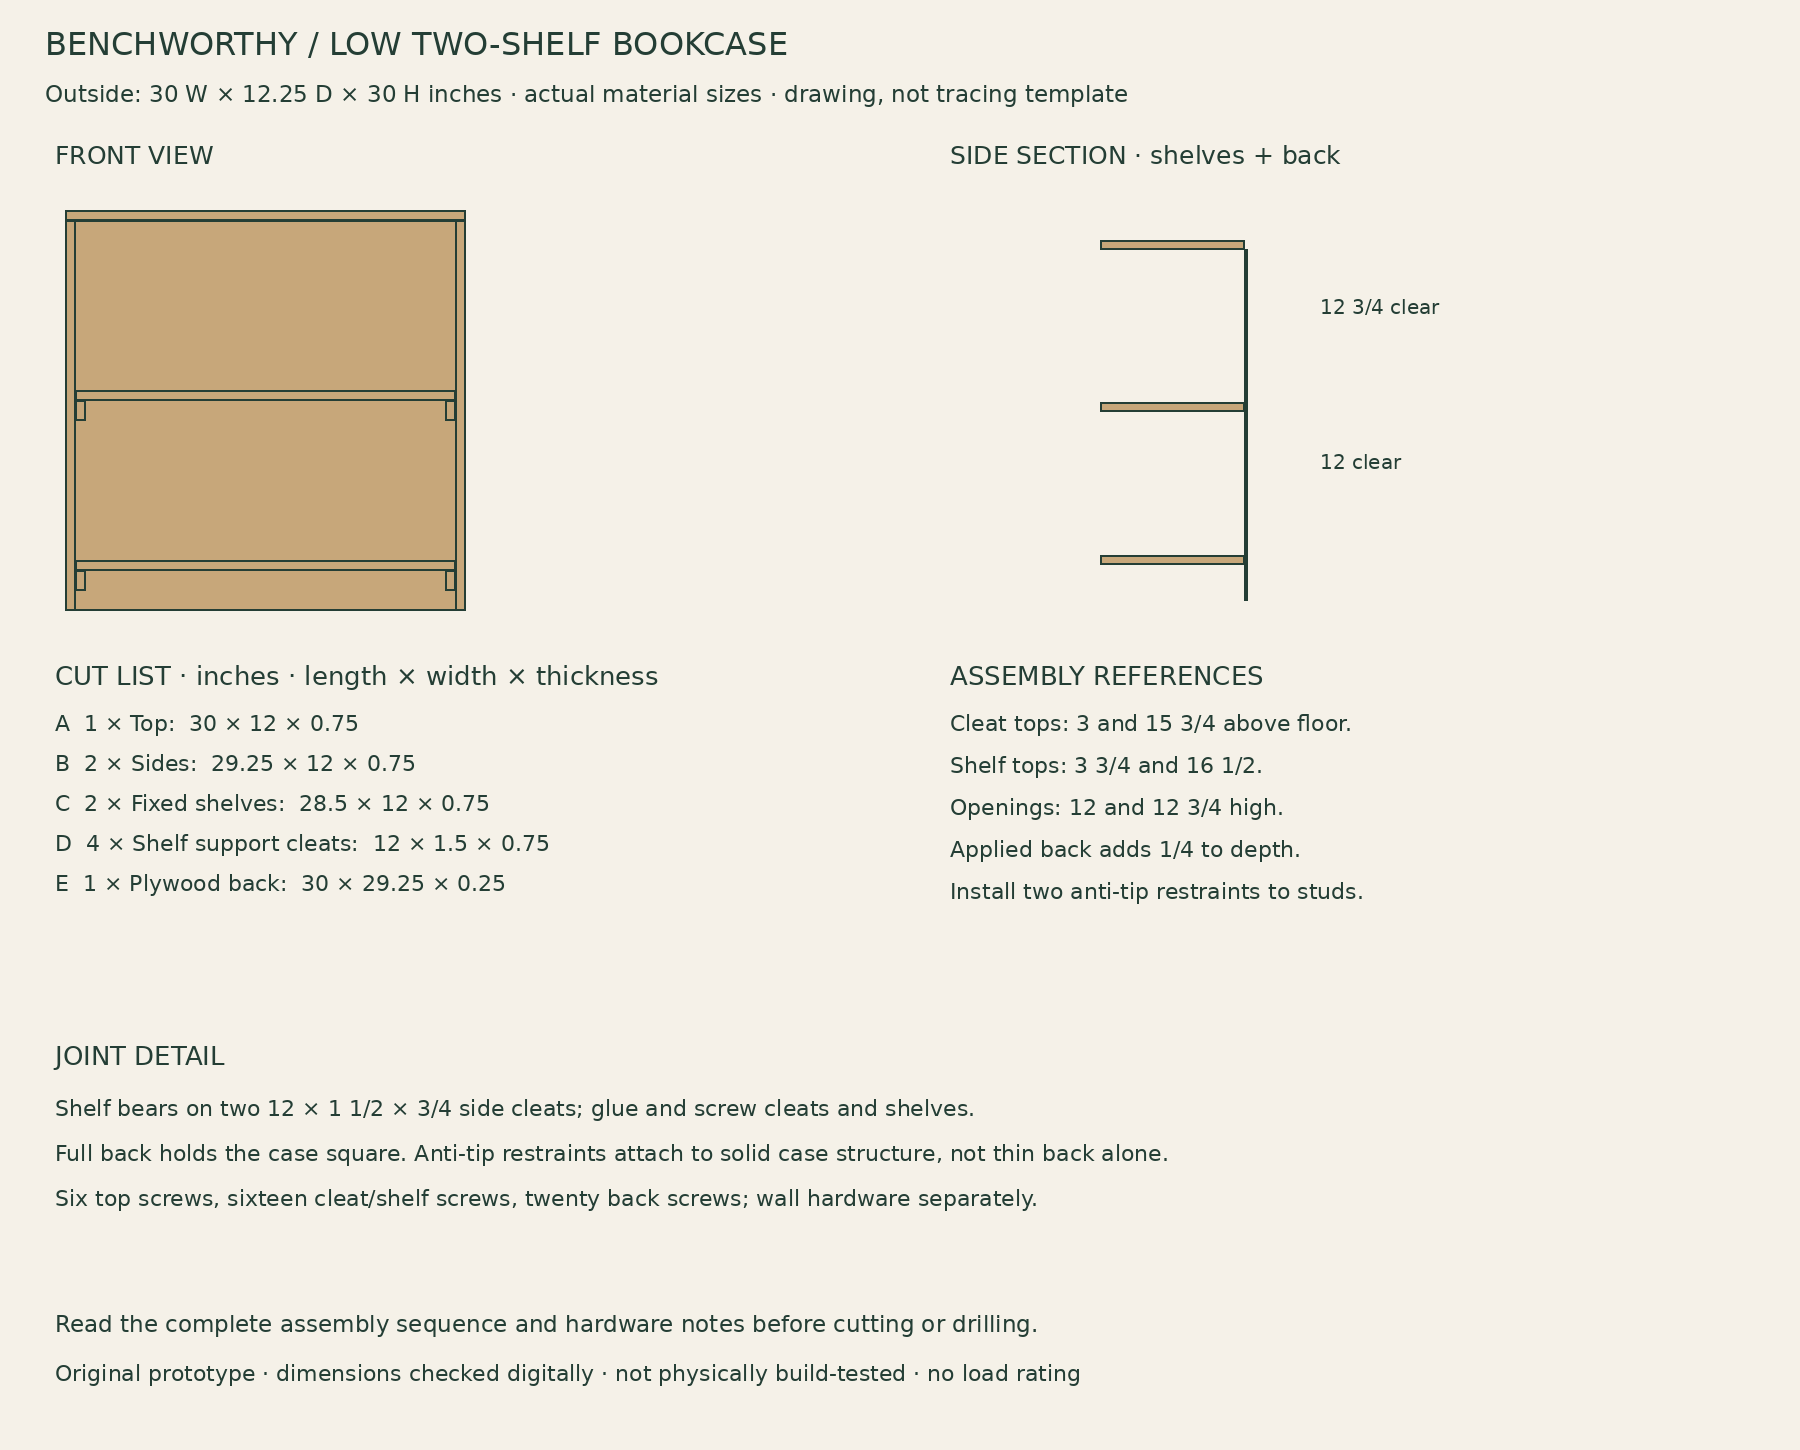
Outside 30 W × 12 1/4 D × 30 H inches including the applied back. Clear shelf width 28 1/2 inches.
Lower shelf top is 3 3/4 inches above the floor; upper shelf top is 16 1/2. Clear opening heights are 12 inches below the upper shelf and 12 3/4 inches below the top.
Select a level wall location with access to wood studs and check any baseboard gap against the anti-tip hardware instructions. This plan does not specify drywall-only anchoring.
Materials and tools
One 4 × 8-foot sheet of actual 3/4-inch plywood
One 4 × 4-foot sheet of actual 1/4-inch plywood for the back
Two furniture anti-tip restraints with wall and furniture fasteners specified by their maker for this construction
Tools: Circular saw with guide and full sheet support; Drill/driver, pilot/clearance bits, countersink and depth stop; Clamps, square, level, tape measure and stud finder.
Cut list
Part
Qty
Length
Width
Thickness
A — Top
1
30 in
12 in
0.75 in
B — Sides
2
29.25 in
12 in
0.75 in
C — Fixed shelves
2
28.5 in
12 in
0.75 in
D — Shelf support cleats
4
12 in
1.5 in
0.75 in
E — Plywood back
1
30 in
29.25 in
0.25 in
Drawings and connections
Use stated dimensions and actual material thickness. Concept images illustrate use; this drawing and the instructions define construction.
Sides are 29 1/4 inches tall; the 3/4-inch top caps them. Shelf boards fit between the sides. Back covers the rear below the top and adds 1/4 inch to depth.
Each 12-inch cleat lies on edge against an inside side face: 1 1/2 inches tall, projecting 3/4 inch. Cleat TOP elevations are 3 and 15 3/4 inches from the floor.
Two #8 × 1 1/4 screws per cleat, through cleat into side, at 3 and 9 inches from front; keep pilots centered vertically. Two more per shelf end, down through shelf into cleat, at 4 and 8 inches from front. Glue both contacts.
Top: three #8 × 1 1/2 screws into each side top edge, at 2, 6 and 10 inches from front. Back: five #6 × 1 screws into each side rear edge, five into each shelf rear edge; keep 2 inches away from corners and space evenly. Pre-drill plywood edges.
Cut five 12-inch crosscut bands from the 8-foot sheet length; take one top, two sides and two shelves across those bands. Measure each new band after the preceding kerf.
Assembly
Cut and inspect. Cut the top, sides, shelves and back square. Match side lengths and shelf lengths. Cut four cleats from the 1×2; use the 6-foot stock to leave kerf allowance. Reject delaminated plywood or split cleats.
Attach shelf supports. Lay the sides inside-face up. Mark cleat tops at 3 and 15 3/4 inches from the bottom. Glue, clamp and screw the cleats to the sides with the specified pilot and clearance holes. Keep each pair level with its mate.
Assemble the cabinet. Stand the sides upright, place the shelves on the cleats and clamp to the 30-inch outside width. Glue and screw shelves down to the cleats. Cap with the top, drill pilots into side top edges and drive six top screws. Do not overdrive.
Square with the back. Lay the cabinet face down on padded supports. Check equal diagonals across the rear, then glue and screw on the 30 × 29 1/4 back flush to side edges and bottoms. Mark shelf elevations on the back before drilling. The back must be attached before standing the case.
Finish and restrain. Allow adhesive cure, sand and finish. Put the empty case in its final level position. Install two compatible anti-tip restraints to sound side/top structure and wall studs exactly as their manufacturer directs; do not fasten furniture-side restraints only to the thin back.
Load gradually. Check joints and restraints, then add books gradually with heavier items on the lower shelf. Stop for sagging, movement, loose fasteners or cracking. No shelf load rating has been established.
Use and care
Do not climb, sit or stand on the bookcase. Keep tempting items off the top where children could climb for them.
Recheck anti-tip attachments after moving and periodically in use. Empty before moving.
The plywood back braces the case; it does not replace wall restraints.
Build notes
This original plan has not been physically build-tested. Digital checks cover dimensions and part fit; they do not establish joint strength, load capacity or long-term performance. Check the actual materials and hardware, dry-fit before fastening, and stop use if joints loosen or parts deform.
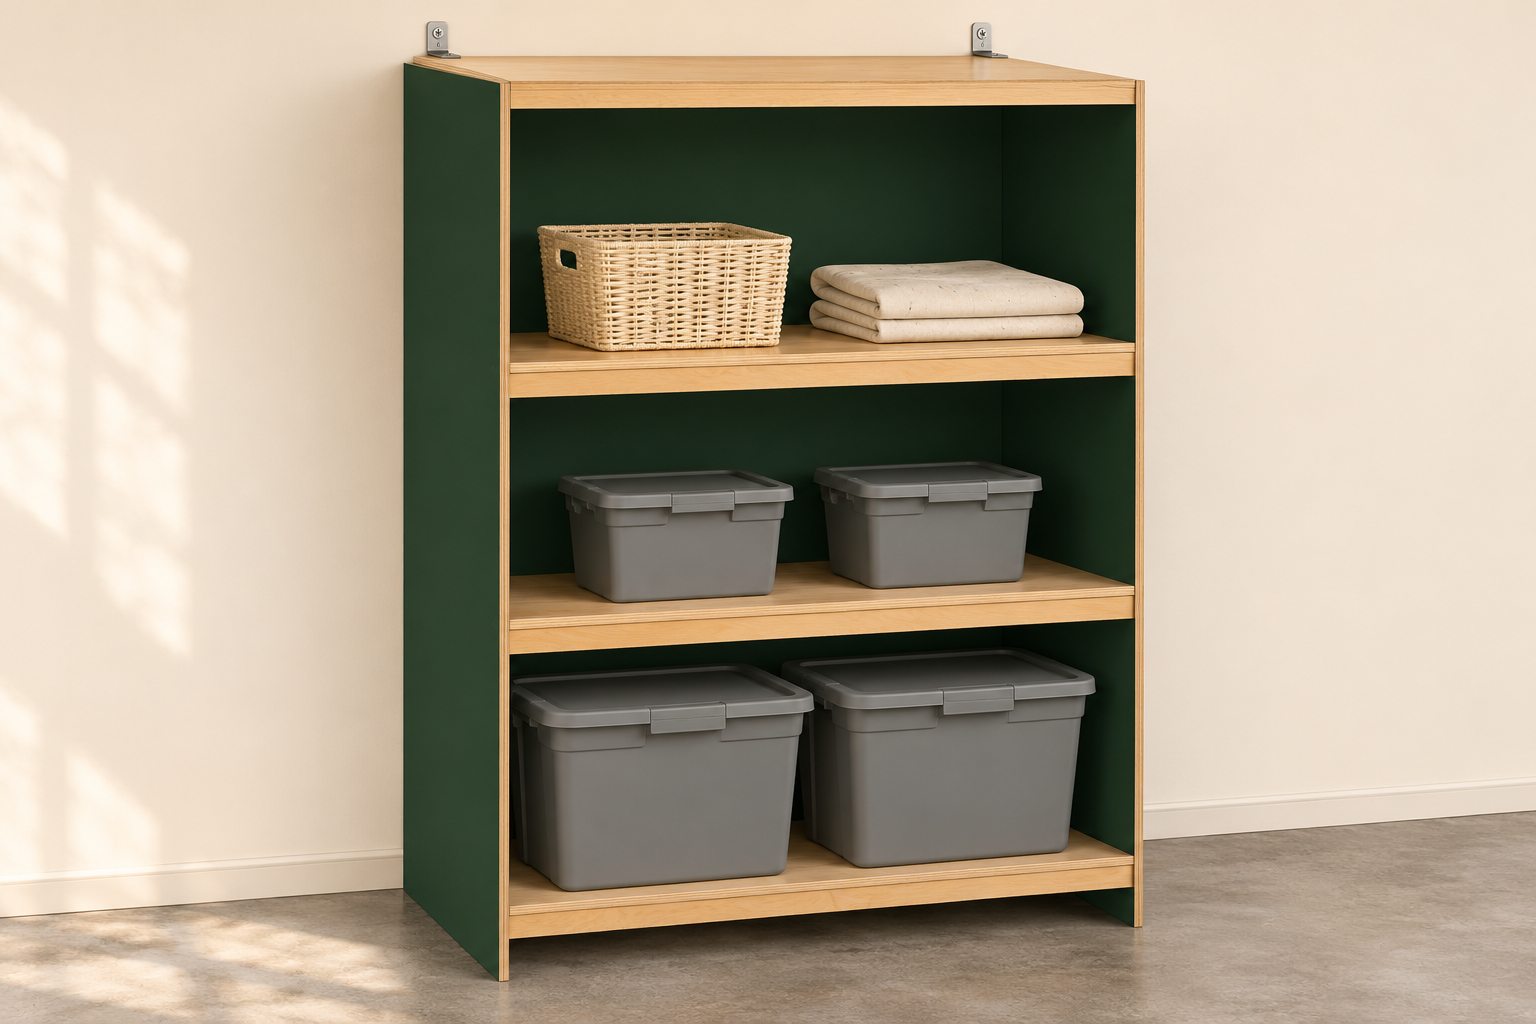
This fixed plywood shelving unit provides three open storage bays for totes, baskets and folded shop supplies. Full-height sides and a full back enclose the storage, while wood cleats support the shelf ends and glued front/rear stiffeners help the shelf decks resist bending. The fourth deck forms the top; leave it clear rather than using it for overhead storage.
The unit is 48 inches wide, 24 inches deep including its back, and 72 inches high. It stands on the floor and must be secured to wood wall studs with two compatible anti-tip restraints before use. The wall connection prevents tipping; the floor supports the cabinet’s weight. This is a dry, indoor storage prototype with no assigned load rating.
Measure your bins and installation space
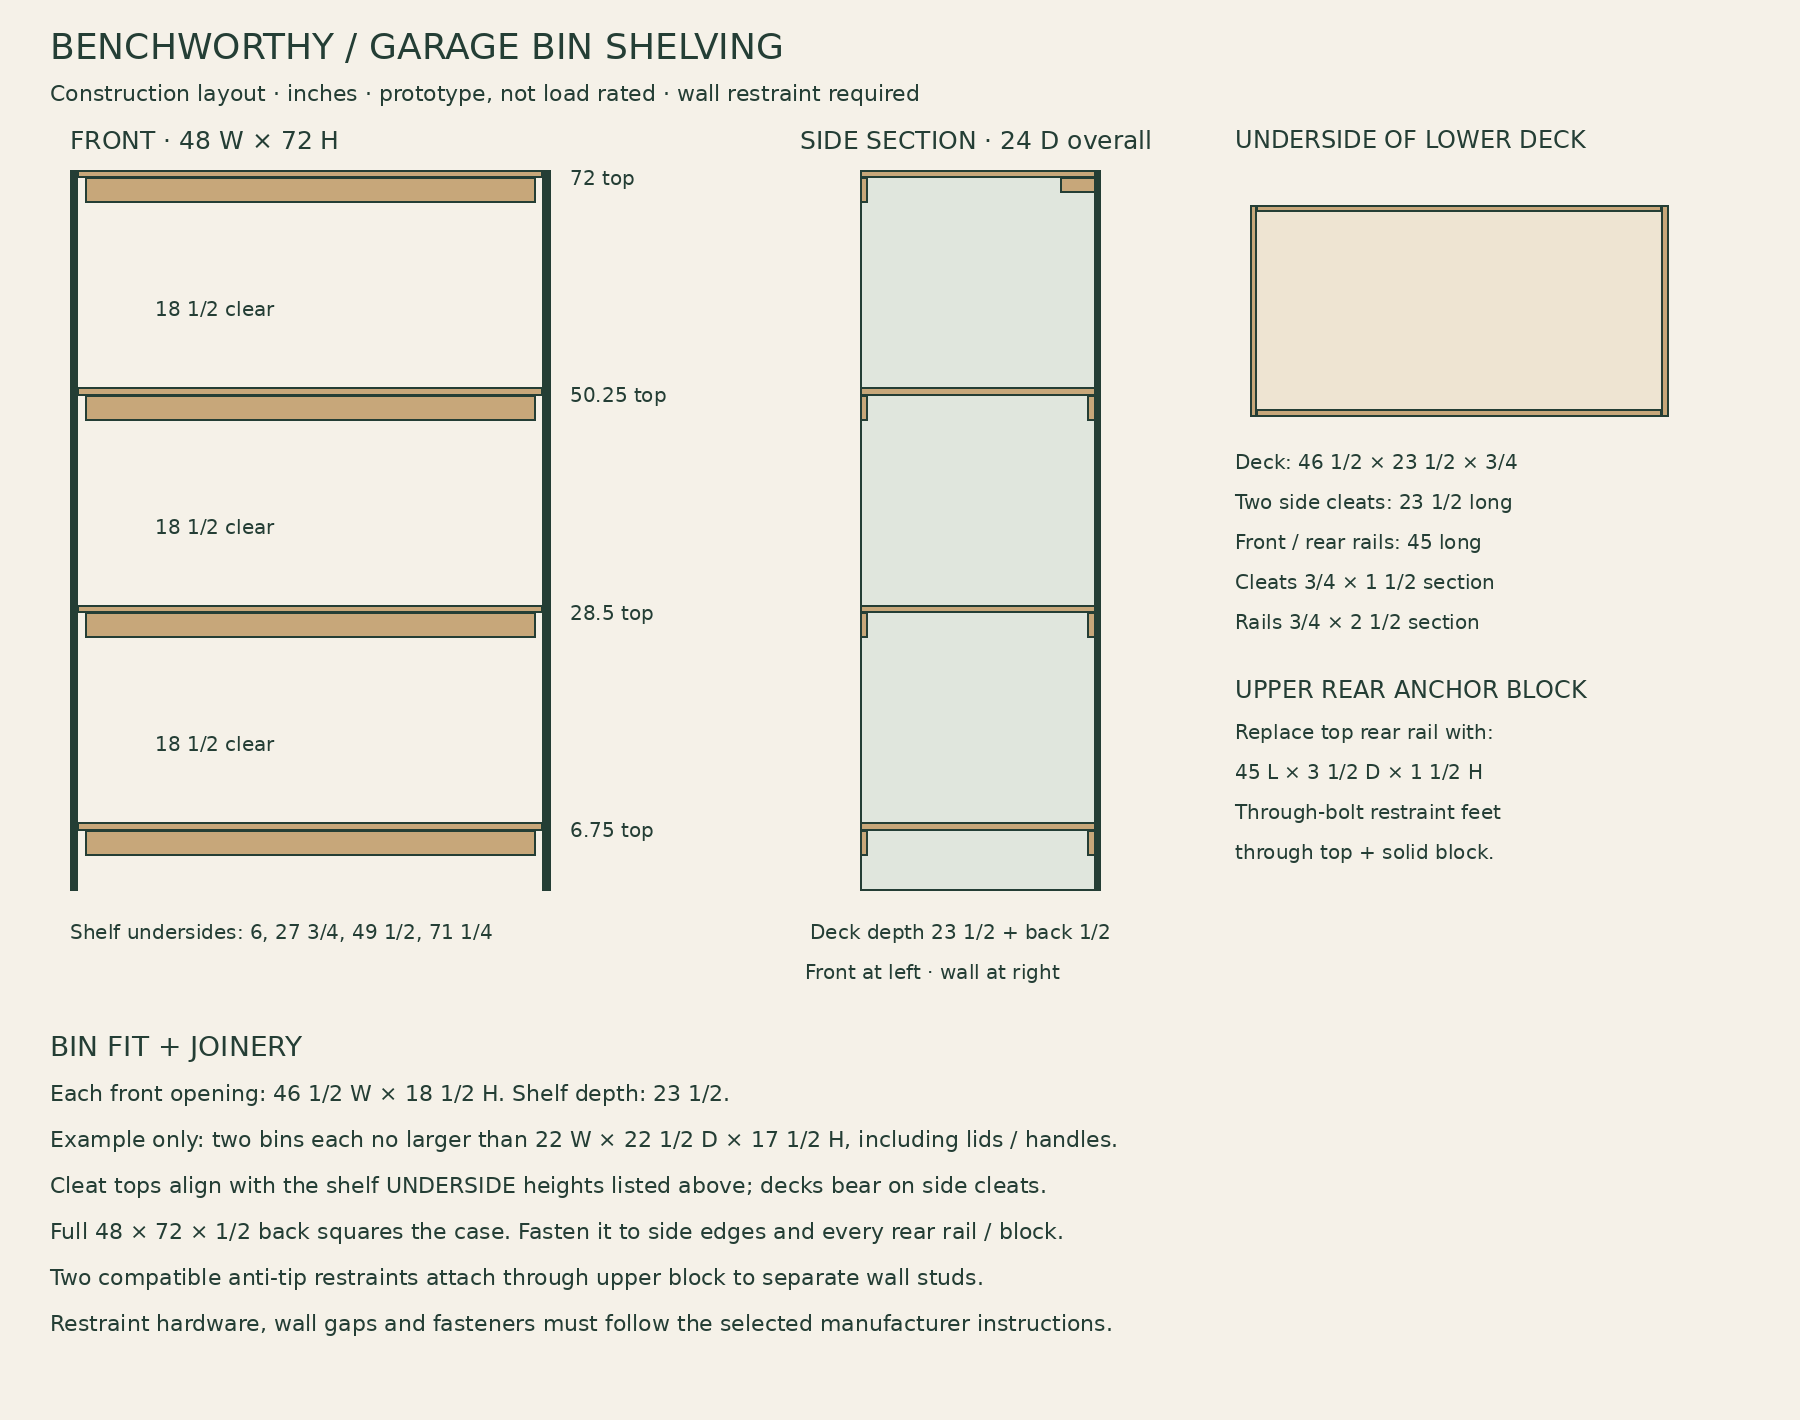
Each of the three front openings is 46 1/2 inches wide and 18 1/2 inches high beneath the front stiffener. The shelf deck is 23 1/2 inches deep. There is more height behind the front rail, but the bin still has to pass through that opening.
As a size example, two bins each up to 22 inches wide × 22 1/2 inches deep × 17 1/2 inches high leave nominal handling space. Measure the maximum outside size including lid, handles and any latch protrusions. These dimensions describe fit, not an approved bin weight or a particular tote product.
Allow space to pull bins straight out, not just room for the cabinet. Locate outlets, garage-door hardware, pipes and switches before choosing a location. Confirm two sound wood studs can be reached by the upper restraints.
Check floor level and moisture. Seal panel edges. Do not place unfinished plywood against a damp slab or use this plan outdoors. Solid full-bearing shims can correct a small floor variation; a significantly sloped garage floor needs a separately designed base. Baseboards may create a wall gap that the selected restraint system must accommodate without bending the brackets.
Cut list
All dimensions are inches and use actual 3/4-inch side/deck plywood, 1/2-inch backing, 3/4 × 1 1/2-inch 1×2 cleats, 3/4 × 2 1/2-inch 1×3 stiffeners and 1 1/2 × 3 1/2-inch 2×4 stock. Measure your materials before cutting. For a 48-inch outside width, deck length = 48 minus twice the actual side thickness. Stiffener and block length = deck length minus twice the cleat thickness. Cut decks to the dry-fitted opening if your stock differs.
ID
Part
Qty
Finished size
A
Sides
2
72 H × 23 1/2 D × 3/4
B
Shelves + top
4
46 1/2 W × 23 1/2 D × 3/4
C
Full back
1
48 W × 72 H × 1/2
D
Side cleats
8
23 1/2 L × 1 1/2 H × 3/4
E
Front / rear stiffeners
7
45 L × 2 1/2 H × 3/4
F
Upper rear anchor block
1
45 L × 3 1/2 D × 1 1/2 H
Material allocation: two full 48 × 96-inch sheets of 3/4-inch plywood and one full sheet of 1/2-inch plywood. From the first thick sheet, crosscut a 72-inch section; rip two 23 1/2-inch-wide sides from it. The remaining approximately 23 7/8 × 48-inch section yields one deck. From the second thick sheet cut three more decks, orienting their 46 1/2-inch dimension across the sheet. The thin sheet yields the 48 × 72-inch back. These layouts allow a nominal 1/8-inch kerf but little extra length for trimming the first sheet; verify usable sheet sizes before committing. The offcuts remain useful for other projects.
Three 8-foot 1×2 boards yield the eight cleats (three per board, one spare). Four 8-foot 1×3 boards yield the seven stiffeners (two per board, one spare). One 8-foot 2×4 yields the anchor block. Reject badly warped, split or knot-weakened pieces, especially the cleats and anchor block.
Drawings and shelf clearances
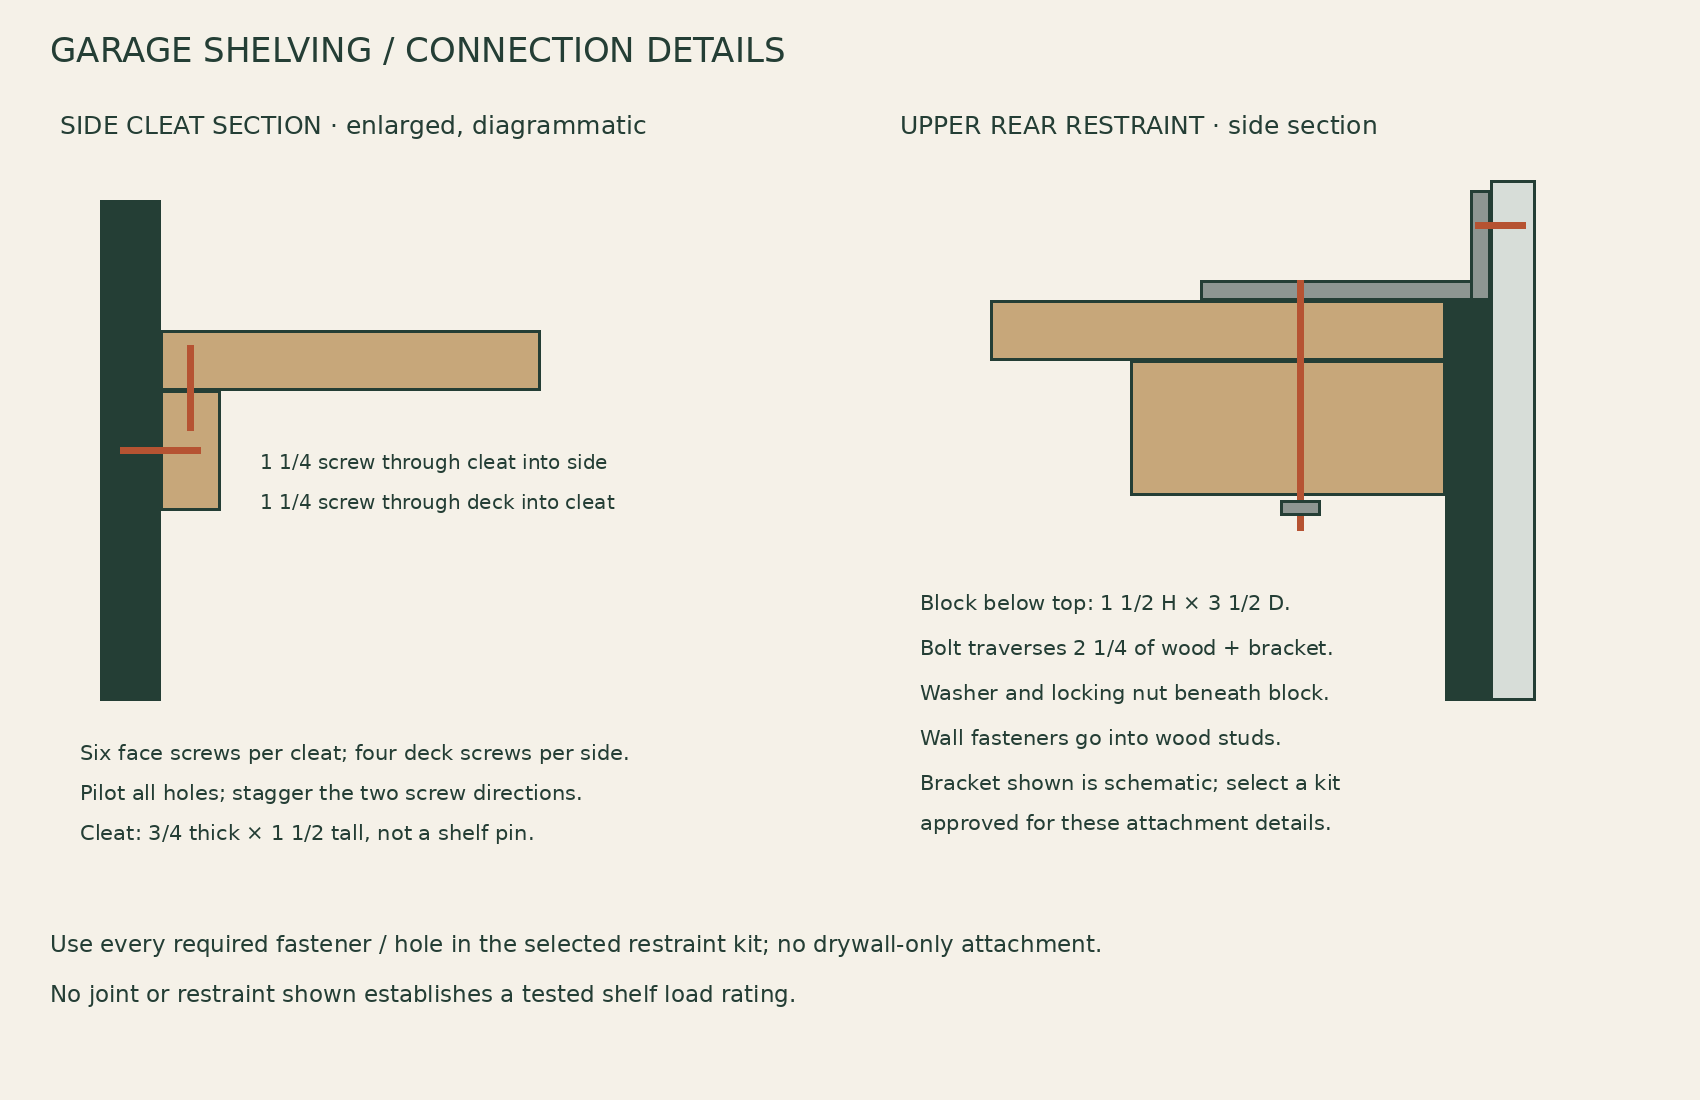
Four decks form three usable bays; shelf undersides are measured from the side-panel bottom.Connection details are schematic. Select anti-tip hardware approved for the illustrated through-bolt and wood-stud attachment.
Fasteners and restraint hardware
Approximately 80 #8 × 1 1/4-inch wood screws: 48 cleat-to-side screws (six per cleat) and 32 deck-to-cleat screws (four per shelf end). The 1 1/4-inch cleat screw passes through the 3/4-inch cleat into 1/2 inch of the side panel; test in scrap so points do not emerge.
Forty #8 × 1 3/4-inch wood screws: five per stiffener and five for the upper rear block, driven through the deck from above. Glue the full contact edges/faces before assembly. These screws draw the parts together; the narrow glued stiffener edge needs continuous contact without gaps.
Approximately 55 #8 × 1-inch screws for the back, plus wood glue. Pilot holes are especially important where screws enter the 3/4-inch side-panel edges. Keep every screw centered in the material it enters. Do not substitute drywall screws.
Two furniture anti-tip angle-bracket assemblies with a manufacturer-approved through-bolt attachment to the cabinet top and screw attachment to wood studs. The upper rear block supplies solid backing under the 3/4-inch top. Choose bracket feet that reach this block and permit fastener holes away from its edges; do not drill or modify the bracket unless permitted.
Cabinet-side bolts, large washers and locking nuts must pass through the bracket, 3/4-inch top and 1 1/2-inch block: 2 1/4 inches of wood plus hardware. Select diameter, length, hole locations and quantity to the restraint manufacturer’s instructions and use every required hole. Wood-stud screws must provide the specified embedment after drywall and any permitted spacers. The thin back alone is not a restraint attachment.
Build the shelving unit
Cut the panels and rails; label front, rear and inside faces. Check the two sides match. Mark four shelf-underside lines on both inside faces: 6, 27 3/4, 49 1/2 and 71 1/4 inches above the panel bottoms. These produce shelf tops at 6 3/4, 28 1/2, 50 1/4 and 72 inches.
Glue and screw one full-depth side cleat below each line, with its TOP on the line and its 3/4-inch-thick dimension projecting inward. Use six 1 1/4-inch screws through each cleat into the side face at approximately 2, 5.9, 9.8, 13.7, 17.6 and 21.5 inches from the front. Center these screws vertically in the 1 1/2-inch cleat height; pilot and countersink without crushing the wood.
Prepare three lower decks with one 45-inch stiffener glued beneath the front edge and one beneath the rear edge. Center each rail across the width, leaving 3/4 inch at each end for the side cleats. The 2 1/2-inch dimension hangs vertically; the 3/4-inch edge contacts the deck. Use five 1 3/4-inch screws from above per rail, spaced along its length and centered across that narrow edge. Clamp flat until cured.
Prepare the top deck with the same front stiffener. At its rear replace the narrow stiffener with the 2×4 anchor block laid FLAT: 3 1/2 inches front-to-back and 1 1/2 inches high. Its rear edge is flush with the deck rear and its ends leave 3/4 inch for each side cleat. Glue and fasten with five 1 3/4-inch screws through the top into the block, along a line about 3/4 inch from its front edge. Reserve the remainder of the block for the selected restraint bolts; lay out all holes first to avoid conflicts.
With a helper, assemble the two sides and four decks on a flat supported surface. Shelf ends sit directly on the cleats; the stiffeners fit between them. Glue the deck-to-cleat contact and fasten each deck end with four 1 1/4-inch screws from above, centered in the cleat’s 3/4-inch projection. Locate these at roughly 3, 8, 13 and 18 inches from the front to avoid the cleat face screws. Pilot and check that the two screw directions do not collide.
Compare the cabinet diagonals and clamp square before attaching the back. Glue the back to the side rear edges and the rear stiffeners/block. Screw the back into the centered side edges at approximately 8-inch spacing, keeping about 2 inches from the ends. Add six screws across each rear rail and the upper block, staying clear of deck screws and future restraint holes. Use 1-inch screws; confirm the points do not emerge through the narrow rails. The full back must be attached before standing the cabinet up.
Seal and finish all exposed surfaces and panel edges; allow glue and finish to cure. With a helper, stand the empty cabinet in place, level it and provide full-bearing support under both side-panel bottoms. Do not load the unit yet.
Locate two separate wood studs near the upper rear block. Fit both anti-tip assemblies according to their instructions. Their horizontal feet must bear on the top over the solid block, not over an unsupported part of the top. Through-bolt the cabinet side using washers and locking nuts accessible from the upper bay; attach the wall side to studs with the specified screws. Accommodate baseboards only with the hardware maker’s approved spacer or strap arrangement. Secure both restraints before use.
Confirm the cabinet is square and stable and all joints and restraints are secure. Try empty bins first. Keep the top clear; place heavier suitable contents in the lowest bay and distribute stored items rather than concentrating weight at the center.
Prototype checks and limits
Unreviewed prototype — not build tested. The geometry, material allocation and nominal fastener clearances have been checked digitally. Shelf bending, cleat connections, racking resistance and anti-tip hardware performance have not been physically tested. No shelf or cabinet load rating is assigned. The concept render demonstrates bin storage; the construction drawings and measured hardware determine the build.
Do not climb, sit or stand on the shelves. Keep children from climbing the unit. The back is for cabinet bracing; the two stud-connected restraints are still required.
Do not use this prototype for engines, batteries, bulk liquid containers, machinery or other concentrated heavy loads. A load rating requires a separate structural design and physical validation.
Inspect for sagging decks, loose cleats, splits, backing separation, floor movement and restraint loosening. Stop using the unit and unload it if any appear.
Before marking the plan build tested, assemble and check a physical prototype with the actual plywood, fasteners, floor condition, wall construction and restraint hardware.